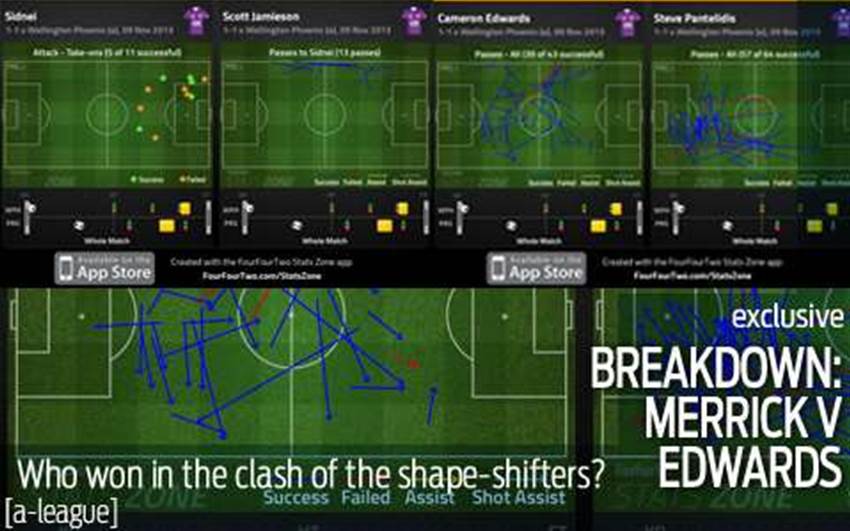
THIS was a clash between two coaches who have been tasked with evolving their side’s style of play towards more proactive systems. They may not necessarily be more successful as of yet but the change afoot in Wellington and Perth was obvious in this 1-1 draw.
Starting with the home side, Ernie Merrick continued with the same side and attacking format that lost 3-2 to Melbourne Victory on Monday, meaning they persisted with the unorthodox back seven, front three setup: at times, it’s almost as if the Phoenix are only attacking with the attacking trio, happy to leave defending to the rest of the side.
However, Jeremy Brockie, Carlos Hernandez and Stein Huysegems still have important roles out of possession, dropping back to form the first ‘wall’ of pressure. They rarely close down the ball carrier, but prevent easy forward passes, and much of the first half was dominated by slow, safe combinations between the back four, goalkeeper Danny Vukovic and Cameron Edwards, who dropped in between the two centre-backs to receive possession.

Once the ball is worked past this initial line of defence, however, the Phoenix front three are absolved of responsibility, and the two forwards, Brockie and Huysegems, look to position themselves in space towards the channels, where they can receive the ball quickly on the break. They are often hit very quickly at transition, with Carlos Hernandez facilitating transitions from a deeper, playmaking role. Phoenix attacks were often very quick, and direct, but that’s not necessarily route one – counter-attacks can be extremely attractive when executed well, although the Phoenix struggled to build momentum in this clash.
There was one pertinent example midway through the first half, when Brockie had simply allowed Scott Jamieson to move upfield – the by-effect was, though, that when the ball was turned over Brockie was in acres of space to receive a pass. The final ball was albeit delayed, but the striker still found time to curl a shot just wide of the far post.

However, the game was dominated by the Glory’s possession play, and indeed, the above example is also instructive in illustrating the advantage Alistair Edward’s side had in wide areas. They were very keen to build possession slowly in deep positions, and often had the ball facing eleven organised Phoenix players: their challenge was to break it down.
With little variety in movement from the attacking quartet, and the Phoenix happy to allow the centre-backs and Edwards time on the ball, the only forward passing option through centre midfield was Jacob Burns. However, Albert Riera was happy to press the Perth captain when he received passes, often forcing him backwards – so the only out-ball for the Glory’s long spells of possession was down the flanks.
After twice knocking a diagonal cross-field ball intended for Sidnei out of play inside the opening ten minutes, Edwards began to play much safer balls, with Michael Thwaite helping to bring Jamieson into play. With the Wellington front three letting him run free, the left-back frequently advanced attacks simply by knocking it down the line his the left-winger and the combination between the two was Perth’s most promising pattern of play.

Wellington’s redeployed right-back Louie Fenton particularly struggled with Sidnei’s direct dribbling and was promptly substituted at half-time, having been left at sea by the Brazilian’s cutting inside – unsurprisingly, Perth’s equaliser came from him getting in behind down the right flank, able to tee up Ryo Nagai for a close range finish.
Manny Muscat coped with him far better in the second half, and it increasingly became obvious that Perth’s most meaningful path to goal was through the full-backs, who motored forward into attacking positions and provided a stream of crosses. Jamieson had three chances to set up McGarry in the box, the Scotsman coming close with a volley near the end of the first half.

In the second, it was Matt Davies who was more prominent, although the quality of his delivery was underwhelming: just a few minutes after he’d overlapped energetically past Nagai to send in a dangerous ball, he ballooned the next cross high into the sky. It showed the trouble with crossing as the main path to goal, although Perth’s issue wasn’t with the crossing itself – it was with the lack of variety in their play.
Their main trait under Edwards is to work the ball out from the back of defence wide, and there’s little creativity in the sense of a classic, playmaking no.10. Ryan Edwards was dropped after failing to impress in the first three games, but his positional replacement, McGarry, pushed forward from a usual deep-lying berth, was no improvement. He rarely received the ball between the lines and the positioning of his passes completed and received in the final third was always in wide areas.

Shane Smeltz, similarly, was rarely involved in build-up play, often simply looking to get on the end of crosses.

To put it another way, it’s been rare to see either Jamie MacLaren or Shane Smeltz being caught offside. Of course, offsides are not something to specifically strive for, but its evidence of a striker running onto a ball in behind: a situation Perth rarely create.
In fact, one of the game’s best chances came when substitute Edwards skipped around a challenge in the midfield zone and play MacLaren in behind. The striker wrong-footed Moss but his shot strayed just wide – it was very atypical of Perth’s attacks, and yet one of their best opportunities in a frantic few minutes where they might have stolen a win.
A draw, though, was a fair result for two clubs on the path of evolution.
Related Articles

Fresh talent flock to ambitious A-League outfit's pro pathway

Why A-League 20/21 is crucial for Olyroos’ medal hopes


